You cup a pearl-sized finch egg in your palm, the room dim and quiet, a cool LED light ready in your other hand. Candling—holding a bright light to an egg—lets breeders peek into a hidden world: veins threading like fine red rivers, a tiny shadow pulsing with life, or the still clarity of an infertile yolk. It’s part science, part gentle ritual, used to check fertility and track development without cracking a shell.
Yes—finch eggs can be candled, and it’s safe when done correctly. Use a cool LED (never a hot bulb), handle briefly and gently, and check at the right window (about days 5–7) for the clearest results. Done well, candling helps confirm fertility, reduce spoilage, and guide better breeding decisions—whether you keep zebra finches, society finches, or Gouldians.
Why breeders candle: to confirm fertility early, monitor embryo growth, remove clears or non-developing eggs, and improve hatch outcomes with minimal disturbance.
Candling at a Glance (Quick Reference)
| What it is | Why it’s used | Best days to check | Light type | Handling time | Main risks if done wrong |
|---|---|---|---|---|---|
| Shining a bright light through a shell to view contents | Verify fertility, monitor development, identify non-viable eggs | ~Day 5–7 after laying (repeat once later if needed) | Small, bright LED (cool, focused beam) | Short: 5–10 seconds per egg | Overheating with hot bulbs, chilling from long exposure, cracking from rough handling |
In the following sections, we’ll keep the story going—showing what you’ll see inside a finch egg, the safest step-by-step technique, simple visuals to compare fertile vs. infertile eggs, and the common mistakes to avoid.
What Is Egg Candling?
Imagine holding a tiny flashlight to the side of an egg and suddenly catching sight of a hidden world inside. That’s candling—an age-old practice that got its name from the way farmers once used actual candles to check eggs. Today, it’s far safer and more precise thanks to cool LED lights that shine just enough brightness through the delicate shell without harming what’s within.
Candling is essentially a non-invasive “X-ray” for bird eggs. By shining a concentrated beam through the shell, you can see whether the egg is fertile, track the progress of an embryo, and spot potential problems like dead embryos or unfertilized yolks. For breeders, it’s an invaluable way to separate fertile eggs from non-fertile ones, reducing the risk of rotting eggs that might contaminate the nest.
Common Tools for Candling Finch Eggs
| Tool | Why It’s Used | Pros | Cons |
|---|---|---|---|
| Small LED flashlight | Most popular choice for finch eggs | Cool, safe, inexpensive, portable | Needs a dark room for best results |
| Specialized egg candler | Designed for poultry and breeders | Strong beam, stable base | Can be too large or strong for tiny finch eggs |
| Phone flashlight (with paper tube) | DIY option when nothing else is handy | Convenient, always available | Not as bright or precise, higher risk of heat |
The General Purpose of Candling
- Check fertility: Identify fertile eggs early and avoid wasting time on clear eggs.
- Monitor growth: See if embryos are developing normally.
- Ensure egg health: Detect cracks, dead embryos, or abnormal growth.
Done carefully, candling is both a science and an art—giving you just enough insight into nature’s most delicate process without disrupting it.
Can Finch Eggs Be Safely Candled?
The short answer is yes—finch eggs can be candled safely, but it must be done with extreme care. Unlike chicken or duck eggs, finch eggs are tiny, thin-shelled, and far more fragile. That means every second counts, and the tools you use matter. With the right approach, candling offers valuable insights into whether your eggs are fertile and developing, without putting them at risk.
The biggest risks breeders face come from rough handling, overheating, and disturbing the incubation cycle. A hot light bulb, for example, can raise the egg’s temperature too quickly and damage the embryo. Similarly, handling an egg too long or turning it unnecessarily can cause tiny fractures in the membrane inside. Even brief cooling from staying out of the nest too long may delay or stop development.
That’s why timing is everything. The ideal window for candling finch eggs is between day 5 and day 7 after laying. At this point, the embryo has developed enough blood vessels and structure to be visible, but not so much that the egg appears completely dark inside. Candle earlier than day 4, and you’ll likely see nothing but a clear yolk. Candle too late, and it can be hard to distinguish a developing chick from an infertile “yolk-only” egg.
Finch Egg Candling Risk Chart
| Factor | Safe Practice | Risk if Ignored |
|---|---|---|
| Timing | Day 5–7 after laying | Too early = nothing visible; too late = hard to read |
| Light Source | Cool LED flashlight | Hot bulbs may overheat and kill embryo |
| Handling | Gently, minimal touching | Rough handling = cracks, membrane damage |
| Duration | 5–10 seconds | Longer = cooling and embryo stress |
Handled with patience and a gentle touch, candling can be one of the most rewarding parts of finch breeding—like peeking at a secret world without breaking the shell.
Step-by-Step Guide: How to Candle Finch Eggs
Picture yourself in a quiet, dimly lit room, nest gently in reach, a cool LED flashlight ready in your hand. The parents have just hopped aside for a moment, giving you the chance to peek inside their delicate treasures. Here’s how to do it safely, step by step.
Step 1: Gather Your Tools
You don’t need much—a small, bright LED flashlight (or a pocket candler), and a dark room where the beam can shine clearly through the shell. Avoid hot bulbs; they can overheat the egg in seconds.
Step 2: Handle with Care
Gently lift the egg with clean, dry hands. Don’t shake or rotate it unnecessarily—finch embryos are fragile, and rough handling can cause damage you can’t see. If possible, candle in the nest by carefully sliding the light under the egg instead of moving it.
Step 3: Position the Light
Hold the egg with the larger end pointing toward the flashlight. This end contains the air sac, which gives you the clearest view of the embryo. Keep the beam focused and steady; the goal is to illuminate without overheating.
Step 4: Look Inside
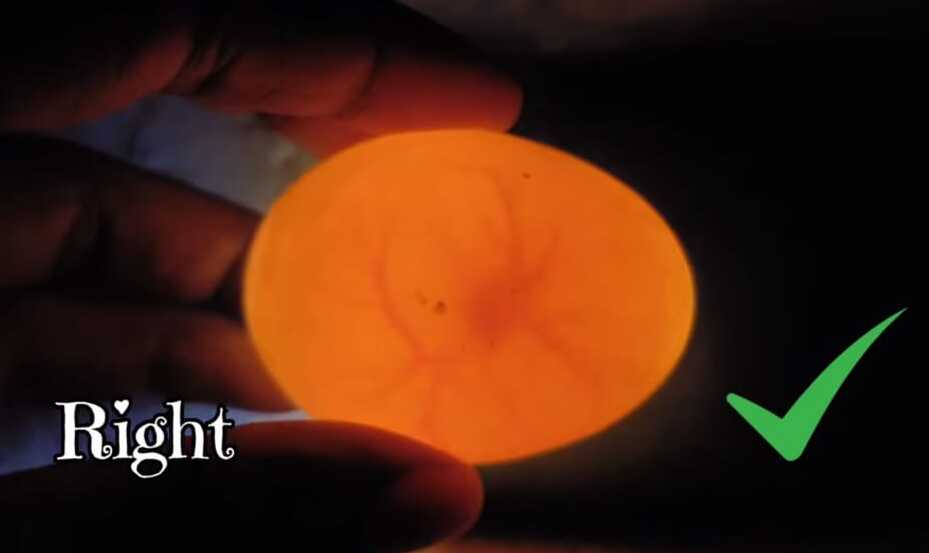
Now comes the magical part. When candled at the right time, fertile finch eggs reveal spidery red veins and sometimes a tiny dark shadow at the center—the embryo itself. Clear, yolk-like eggs usually mean infertility. Later in development, you may even notice movement or a darkened mass filling most of the shell.
What You Might See
| Stage | What You’ll Notice | What It Means |
|---|---|---|
| Clear, no veins | Egg looks yellowish and transparent | Infertile or too early (< Day 4) |
| Red veins visible | Fine lines spreading inside | Fertile and developing |
| Dark spot with veins | Small shadow at center, pulsing | Embryo growing |
| Blood ring | Red circle, no further development | Embryo died early |
| Mostly dark | Egg filled with shadow, air sac still visible | Late-stage chick about to hatch |
Candling finch eggs is like opening a tiny window into nature’s hidden workshop. Done quickly and gently, it gives you a chance to follow the story of life unfolding inside a shell—without ever breaking it.
What You’ll See Inside a Finch Egg
The first time you candle a finch egg, it feels like watching a secret world reveal itself—tiny veins like spiderwebs, a shadow that wasn’t there yesterday, or sometimes, an empty glow that tells another story. Knowing what you’re looking at makes all the difference between guesswork and real insight.
Signs of a Fertile Egg
- Blood vessels: Thin red lines spreading out from the center, like a tiny map.
- Dark spot (embryo): Around day 5–7, you’ll see a darker shadow forming where the chick grows.
- Movement: In later stages, the embryo may wiggle slightly when you turn the egg, or you’ll see the mass shift gently.
Signs of an Infertile Egg
- Clear appearance: The egg glows evenly yellowish when candled.
- No veins or shadow: Nothing changes even after a week of incubation.
- Still yolk: It looks the same day after day, showing no signs of life.
Signs of a Dead Embryo
- Blood ring: A red circle around the yolk, indicating the embryo started but didn’t survive.
- No further growth: Once movement and veins stop developing, the egg darkens unevenly.
- Collapsed veins: Instead of a network of bright red lines, the vessels look broken or blurry.
Finch Egg Candling Guide (Quick Reference)
| Stage | What You See | What It Means |
|---|---|---|
| Clear, yellow glow | No veins, no dark spot | Infertile or very early |
| Veins + dark spot | Embryo growing | Fertile, healthy egg |
| Dark mass, moving | Chick filling shell | Late development |
| Blood ring | Circular red line | Dead embryo |
| No change over time | Still clear, yellow | Infertile, not viable |
Candling becomes more than just checking fertility—it’s like flipping through the pages of an invisible story. Each glow, each vein, and each shadow tells you whether life is beginning, paused, or has sadly ended inside that fragile shell.
Precautions and Best Practices
Candling finch eggs is a privilege—it gives you a glimpse into the hidden life inside a shell. But with that privilege comes responsibility. Because finch eggs are so delicate, even small mistakes can mean the difference between a thriving chick and a lost one. That’s why following a few careful rules is essential.
Keep It Minimal
Less is more. Candle no more than once or twice during the entire incubation period. Overhandling raises the risk of cooling or damaging the eggs. Think of candling as a quick check-up, not a daily ritual.
Handle With Clean Hands
Always wash and dry your hands before touching the eggs. Finch eggs have a natural protective coating that can be damaged by oils, dirt, or moisture. Clean hands protect both the shell and the developing chick.
Make It Quick
Each candling session should last only 5–10 seconds per egg. The longer the egg stays out of the nest, the greater the chance of chilling, especially if the room is cooler than the nest box. Quick checks protect the embryo’s natural rhythm of warmth.
Don’t Overdo It
Not every egg needs to be candled. If you’re unsure or new to breeding, it’s often safer to leave questionable eggs in the nest and let time tell the story. Experienced breeders may candle selectively, but even then, restraint is key.
Finch Egg Candling Safety Checklist
✅ Candle only once or twice
✅ Wash and dry hands first
✅ Use a cool LED light only
✅ Keep it under 10 seconds per egg
✅ Handle as little as possible
✅ Leave uncertain eggs to nature
Handled wisely, candling becomes a safe, supportive tool rather than a risk. Think of it as gently opening a window, peeking at life inside, and closing it quickly so nature can continue its quiet work.
Alternatives to Candling
Not every breeder feels comfortable holding finch eggs up to a light—and that’s perfectly fine. Nature has its own way of signaling what’s happening inside the nest, and with patience, you can often learn just as much by watching quietly from the outside.
Reading the Parents’ Behavior
Finches are instinctive and diligent parents. If they are sitting tightly on the eggs, turning them regularly, and guarding the nest, chances are good the clutch is fertile. Parents won’t usually waste weeks of effort on clear eggs, so their dedication is often the first sign of life inside.
Letting Time Do the Work
Another option is simply waiting until hatch day. Finch eggs typically hatch around 13–16 days after laying begins. If nothing happens by day 20, the eggs are almost certainly infertile or non-viable. This method requires patience, but it completely removes the risks of handling.
Pros and Cons of Skipping Candling
| Approach | Pros | Cons |
|---|---|---|
| Observe parents | Non-invasive, no risk to eggs, easy for beginners | Doesn’t confirm fertility early, may waste time on clear eggs |
| Wait for hatch | Zero handling, completely natural process | Can be frustrating if eggs are infertile, delays re-breeding |
| No candling at all | Safest option for eggs | Less control, harder to track breeding progress |
Sometimes the best choice is simply to trust the parents and allow nature to take its course. Candling may satisfy curiosity and guide breeding management, but patience and observation can be just as powerful—without ever touching a single egg.
Common Mistakes to Avoid
Every finch breeder has felt the temptation to peek just a little too soon, or hold the egg up to the light just one more time. But candling is a delicate balance—done wrong, it can cost you the very chicks you’re hoping to raise. Here are the pitfalls you’ll want to steer clear of.
Candling Too Early
It’s easy to get impatient, but before day 4 or 5, there’s almost nothing to see. At this stage, even a fertile egg looks clear, which often leads beginners to discard perfectly good eggs. Waiting until day 5–7 gives you the clearest, most reliable view.
Using the Wrong Light
Hot incandescent bulbs are dangerous for tiny finch eggs. The shell is so thin that the heat can cook the embryo in seconds. A cool LED flashlight is the only safe choice—bright enough to illuminate, but gentle enough to protect.
Rough Handling
Shaking, dropping, or even rotating an egg too much can rupture the membranes inside. Finch eggs are smaller than a marble, and what feels like a light touch to us may be devastating to them. Always lift and hold them as if they could break at the slightest pressure—because they can.
Overhandling
Checking every egg, every day, might satisfy curiosity, but it disrupts incubation and cools the embryos. Limit candling to once or twice, keep it brief, and let the parents do their work. Overhandling is the most common mistake beginners make—and one of the most avoidable.
Quick Don’ts for Safe Candling
❌ Don’t candle before day 5
❌ Don’t use hot bulbs
❌ Don’t shake, drop, or rotate eggs too much
❌ Don’t candle repeatedly out of curiosity
Think of candling as borrowing a moment from nature—you’re only allowed a quick peek before handing everything back. Respect that limit, and you’ll avoid most of the mistakes that cause heartache for new breeders.
Conclusion
Candling finch eggs is like holding a secret in your hands—a chance to glimpse the fragile beginnings of life without ever breaking the shell. Yes, it can be done safely, but only with the right timing, the right tools, and the gentlest touch. The truth is, candling isn’t about curiosity—it’s about care, helping you identify fertile eggs, track healthy development, and avoid risks to the clutch.
For beginners, patience is often the safer path. Watching the parents incubate, trusting nature’s timing, and waiting for hatch day spares the eggs any disturbance. For experienced breeders, candling—done just once or twice during incubation—can be an invaluable management tool.
At the heart of it all, finch eggs remind us that life starts small, delicate, and hidden. Treat them with respect, resist the urge to overhandle, and remember that sometimes the best care is simply letting nature continue its quiet work.
Recent Posts
The Ultimate Owl Finch Cage Size Guide: More Than a Cage, It's a World
You’ve done it. You’ve brought home one of nature’s most charming creations, the Owl Finch. You watch, mesmerized, as this tiny, feathered jewel explores its new surroundings. But then, a...
The Ultimate Guide to the Owl Finch Breeding Season: A Story of New Life
There is a moment every bird keeper dreams of: a faint "peep" from the nest box that signifies new life. Yet, for many, the path to that moment feels daunting. The questions surrounding the Owl Finch...